
Hello Readers,

It has been a while since my last posting. I apologize! A family holiday, end of summer and back-to-school for my son had kept me busy. Anyway, today's embroidery... Kasuti!
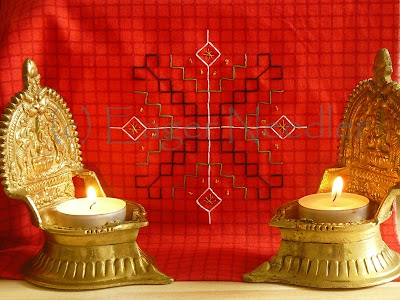
Checked fabrics are ideal for Kasuti embroidery. Here is a sample along with a design that you can print and try.
The design is a simple one. It is made even simpler with a checked fabric. The work is done using the double running stitch. In Kasuti, the double running stitch, when worked as a straight line is called Gavanthe. And when used in a zig zag way (that looks like little steps), it is called Muragi. The design is identical on both sides of the fabric. In the end, I added 'stars' and tiny French knots in gold thread.
Since I chose a fabric with large squares, I had enough room for the additional embellishment. But this is optional. The design will look equally nice on a plain fabric as well. You are welcome to print the design, trace it or use it as is along with the instructions.
If Kasuti is new to you, please take a look at the Kasuti Tutorial before you begin. It explains the double running stitch.

Instructions.
* First, start at the center and work on any one of the four straight lines that has the diamond at the end (the white thread in the sample) using the double running stitch. You will always end and start again at the center. Complete the other three lines. End on the reverse side.
* Next, choose any one corner of the 'three diamond' diagonal line (the black thread in the sample), close to the center of the design. Follow the design, going up and down all the way to the end and come back to finish it. You will come back to the point where you started. Then follow along on the square and make your way to the second diagonal line (there will be gaps in the square that you can fill in later). Complete the third and fourth diagonal lines in the same way. After you finish the fourth line, go backwards to finish the square. End on the reverse side.
* To finish the last step, i.e the zig zag lines worked in the green thread, you will have to work on each part separately. Choose one part, follow the design and when you reach the end, work backwards to fill the gaps. End on the reverse side as neatly as possible. Cut the thread and move to the next part.
| You might also be interested in... | |
 |  |
| Kasuti - Pride of Karnataka | Kasuti Tutorial |
1 comment:
Hi..
The tutorials were very good. The way of explaining the stitch with photos shows your expertise and patience. Thank you for giving such a good tutorial.
Padmaja
Post a Comment